vue 多入口文件搭建 vue多页面搭建的实例讲解
来源:菜鸟下载 | 更新时间:2025-04-26
下面我就为大家分享一篇vue 多入口文件搭建 vue多页面搭建的实例讲解,具有很好的参考价值,希望对大家有所帮助。红色为更改后的不同之处
下面我就为大家分享一篇vue 多入口文件搭建 vue多页面搭建的实例讲解,具有很好的参考价值,希望对大家有所帮助。
免费影视、动漫、音乐、游戏、小说资源长期稳定更新! 👉 点此立即查看 👈
红色为更改后的不同之处
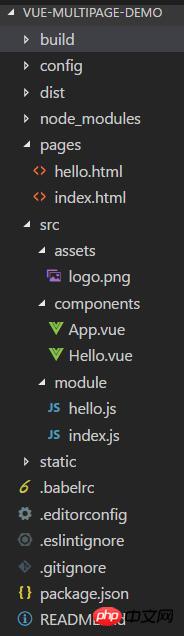
vue 多入口文件搭建
在webpack.base.conf
立即学习“前端免费学习笔记(深入)”;
中修改
varpath = require('path')varconfig = require('../config')varutils = require('./utils')varprojectRoot = path.resolve(__dirname,'../')var glob = require('glob');var entries = getEntry('./src/module/*.js'); // 获得入口js文件module.exports = {entry: entries,output: {path:config.build.assetsRoot,publicPath:process.env.NODE_ENV ==='production' ? config.build.assetsPublicPath :config.dev.assetsPublicPath,filename: '[name].js'},resolve: {extensions: ['','.js','.vue'],fallback: [path.join(__dirname,'../node_modules')],alias: {'src':path.resolve(__dirname,'../src'),'assets':path.resolve(__dirname,'../src/assets'),'components':path.resolve(__dirname,'../src/components')}},resolveLoader: {fallback: [path.join(__dirname,'../node_modules')]},module: {loaders: [{test: /.vue$/,loader:'vue'},{test: /.js$/,loader:'babel',include:projectRoot,exclude: /node_modules/},{test: /.json$/,loader:'json'},{test: /.html$/,loader:'vue-html'},{test: /.(png|jpe?g|gif|svg)(?.*)?$/,loader:'url',query: {limit:10000,name:utils.assetsPath('img/[name].[hash:7].[ext]')}},{test: /.(woff2?|eot|ttf|otf)(?.*)?$/,loader:'url',query: {limit:10000,name:utils.assetsPath('fonts/[name].[hash:7].[ext]')}}]},vue: {loaders:utils.cssLoaders()}}function getEntry(globPath) {var entries = {},basename, tmp, pathname;glob.sync(globPath).forEach(function (entry) {basename = path.basename(entry, path.extname(entry));console.log(1,basename);tmp = entry.split('/').splice(-3);console.log(2,tmp);pathname = basename; // 正确输出js和html的路径console.log(3,pathname);entries[pathname] = entry;console.log(4,entry);});console.log("base-entrys:");console.log(5,entries);return entries;}登录后复制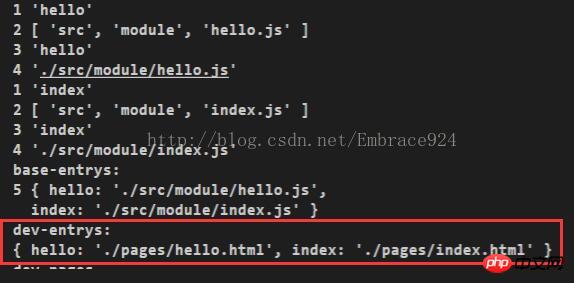
这样一来的话,就在中细分,最后输出html都在dist下。
这里的字符串操作也是和路径的情况相匹配的,如果有需要进行其他方式的设定,注意在这里修改路径的识别。
vue多页面搭建
原本的webpack.dev.conf中有一个插件的设置内容
对这部分内容进行修改
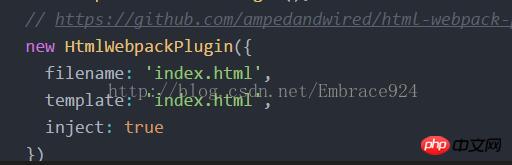
varconfig = require('../config')varwebpack = require('webpack')varmerge = require('webpack-merge')varutils = require('./utils')varbaseWebpackConfig = require('./webpack.base.conf')varHtmlWebpackPlugin = require('html-webpack-plugin')var path = require('path');var glob = require('glob');// add hot-reload related code to entry chunksObject.keys(baseWebpackConfig.entry).forEach(function (name) {baseWebpackConfig.entry[name] = ['./build/dev-client'].concat(baseWebpackConfig.entry[name])})module.exports =merge(baseWebpackConfig, {module: {loaders:utils.styleLoaders({sourceMap: config.dev.cssSourceMap })},// eval-source-map is faster for developmentdevtool:'#eval-source-map',plugins: [newwebpack.DefinePlugin({'process.env':config.dev.env}),// https://github.com/glenjamin/webpack-hot-middleware#installation--usagenewwebpack.optimize.OccurenceOrderPlugin(),newwebpack.HotModuleReplacementPlugin(),newwebpack.NoErrorsPlugin(),// https://github.com/ampedandwired/html-webpack-plugin]})function getEntry(globPath) {var entries = {},basename, tmp, pathname;glob.sync(globPath).forEach(function(entry) {basename = path.basename(entry, path.extname(entry));tmp = entry.split('/').splice(-3);pathname = basename; // 正确输出js和html的路径entries[pathname] = entry;});console.log("dev-entrys:");console.log(entries);return entries;}var pages = getEntry('./pages/*.html');console.log("dev pages----------------------");for (var pathname in pages) {console.log("filename:" + pathname + '.html');console.log("template:" + pages[pathname]);// 配置生成的html文件,定义路径等var conf = {filename: pathname + '.html',template: pages[pathname], // 模板路径minify: { //传递 html-minifier 选项给 minify 输出removeComments: true},inject: 'body', // js插入位置chunks: [pathname, "vendor", "manifest"] // 每个html引用的js模块,也可以在这里加上vendor等公用模块};// 需要生成几个html文件,就配置几个HtmlWebpackPlugin对象module.exports.plugins.push(new HtmlWebpackPlugin(conf));}----------------------------------------------webpack.prod.conf配置和webpack.dev.conf.js中做类似的处理,先注释掉原来的HtmlWebpackPlugin,然后在下面添加函数,通过迭代插入多个HtmlWebpackPlugin。varpath =require('path')varconfig =require('../config')varutils =require('./utils')varwebpack =require('webpack')varmerge =require('webpack-merge')varbaseWebpackConfig =require('./webpack.base.conf')varExtractTextPlugin =require('extract-text-webpack-plugin')varHtmlWebpackPlugin =require('html-webpack-plugin')varenv =process.env.NODE_ENV ==='testing'?require('../config/test.env'):config.build.envvarglob =require('glob');module.exports =merge(baseWebpackConfig, {module: {loaders:utils.styleLoaders({sourceMap:config.build.productionSourceMap,extract:true })},devtool:config.build.productionSourceMap ?'#source-map' :false,output: {path:config.build.assetsRoot,filename:utils.assetsPath('js/[name].[chunkhash].js'),chunkFilename:utils.assetsPath('js/[id].[chunkhash].js')},vue: {loaders:utils.cssLoaders({sourceMap:config.build.productionSourceMap,extract:true})},plugins: [// http://vuejs.github.io/vue-loader/workflow/production.htmlnewwebpack.DefinePlugin({'process.env':env}),newwebpack.optimize.UglifyJsPlugin({compress: {warnings:false}}),newwebpack.optimize.OccurenceOrderPlugin(),// extract css into its own filenewExtractTextPlugin(utils.assetsPath('css/[name].[contenthash].css')),// generate dist index.html with correct asset hash for caching.// you can customize output by editing /index.html// see https://github.com/ampedandwired/html-webpack-plugin// new HtmlWebpackPlugin({// filename: process.env.NODE_ENV === 'testing'// ? 'index.html'// : config.build.index,// template: 'index.html',// inject: true,// minify: {// removeComments: true,// collapseWhitespace: true,// removeAttributeQuotes: true// // more options:// // https://github.com/kangax/html-minifier#options-quick-reference// },// // necessary to consistently work with multiple chunks via CommonsChunkPlugin// chunksSortMode: 'dependency'// }),// split vendor js into its own filenewwebpack.optimize.CommonsChunkPlugin({name:'vendor',minChunks:function (module,count) {// any required modules inside node_modules are extracted to vendorreturn (module.resource &&/.js$/.test(module.resource) &&module.resource.indexOf(path.join(__dirname,'../node_modules')) ===0)}}),// extract webpack runtime and module manifest to its own file in order to// prevent vendor hash from being updated whenever app bundle is updatednewwebpack.optimize.CommonsChunkPlugin({name:'manifest',chunks: ['vendor']})]})if (config.build.productionGzip) {varCompressionWebpackPlugin =require('compression-webpack-plugin')webpackConfig.plugins.push(newCompressionWebpackPlugin({asset:'[path].gz[query]',algorithm:'gzip',test:newRegExp('\.(' +config.build.productionGzipExtensions.join('|') +')$'),threshold:10240,minRatio:0.8}))}function getEntry(globPath) {var entries = {},basename, tmp,pathname;glob.sync(globPath).forEach(function (entry) {basename = path.basename(entry,path.extname(entry));tmp = entry.split('/').splice(-3);pathname = tmp.splice(0,1) + '/' + basename; // 正确输出js和html的路径entries[pathname] =entry;});console.log("prod-entrys:");console.log(entries);return entries;}var pages =getEntry('./pages/*.html');console.log("prod pages-----");for (varpathname inpages) { console.log("filename:"+pathname +'.html');console.log("template:"+pages[pathname]);// 配置生成的html文件,定义路径等var conf = {filename: pathname +'.html',template: pages[pathname],// 模板路径minify:{ //removeComments:true,collapseWhitespace: false},inject: true,// js插入位置chunks: [pathname,"vendor", "manifest"]// 每个html引用的js模块,也可以在这里加上vendor等公用模块};// 需要生成几个html文件,就配置几个HtmlWebpackPlugin对象module.exports.plugins.push(newHtmlWebpackPlugin(conf));}登录后复制上面是我整理给大家的,希望今后会对大家有帮助。
相关文章:
微信小程序之分享页面如何返回首页的示例
js中el表达式的使用和非空判断方法
JS实现左边列表移到到右边列表功能
菜鸟下载发布此文仅为传递信息,不代表菜鸟下载认同其观点或证实其描述。
展开

相关文章
更多>>


热门游戏
更多>>


热点资讯
更多>>热门排行
更多>>- 月斩星离最新排行榜-月斩星离手游免费版下载-月斩星离免费破解版下载
- 我有上将游戏排行-我有上将所有版本-我有上将游戏合集
- 万古凡心系列版本排行-万古凡心系列游戏有哪些版本-万古凡心系列游戏破解版
- 类似魔剑风云的手游排行榜下载-有哪些好玩的类似魔剑风云的手机游戏排行榜
- 剑豪猎人题材手游排行榜下载-有哪些好玩的剑豪猎人题材手机游戏推荐
- 傲视遮天题材手游排行榜下载-有哪些好玩的傲视遮天题材手机游戏推荐
- 命运先锋最新排行榜-命运先锋手游免费版下载-命运先锋免费破解版下载
- 类似砰砰射击的手游排行榜下载-有哪些好玩的类似砰砰射击的手机游戏排行榜
- 古墓暗影手游2023排行榜前十名下载_好玩的古墓暗影手游大全
- 幻灵战歌游戏排行-幻灵战歌所有版本-幻灵战歌游戏合集
- 冰雪传说题材手游排行榜下载-有哪些好玩的冰雪传说题材手机游戏推荐
- 浅海逃亡最新排行榜-浅海逃亡手游免费版下载-浅海逃亡免费破解版下载